There’s a ton of options when it comes to custom kydex holsters. The hard part is finding the right fit for your needs because everyone has their own body shape and lifestyle. Johnny, the lead instructor over at Iron Works Tactical says it best, “Everyone is their own unique snowflake.”
I recently attended the Iron Works Tactical EDC class and used some brand new kit made specifically for me by Mark, of Thomas Tactical Precision (@thomas_tactical_precision on Instagram)
I was invited to the class about three weeks prior by my friend Jeff, who asked me what I was going to run and what kit I was running (Glock 43). A few days later, he told me to ship one of my spare magazines over to Mark so he could work on some kit for me.
TTP is a one-man operation and Mark has a full-time job so with the short notice, he had to scramble to get the holsters out to me. He worked closely with Brett from Iron Works Tactical on this project for me. Brett had some ideas that he thought would make it a better holster with his extensive experience in this field. After four different designs, Mark finally got the finished product just a day or two before the class. He hand delivered the fresh new holsters to me at the range just prior to the class starting.
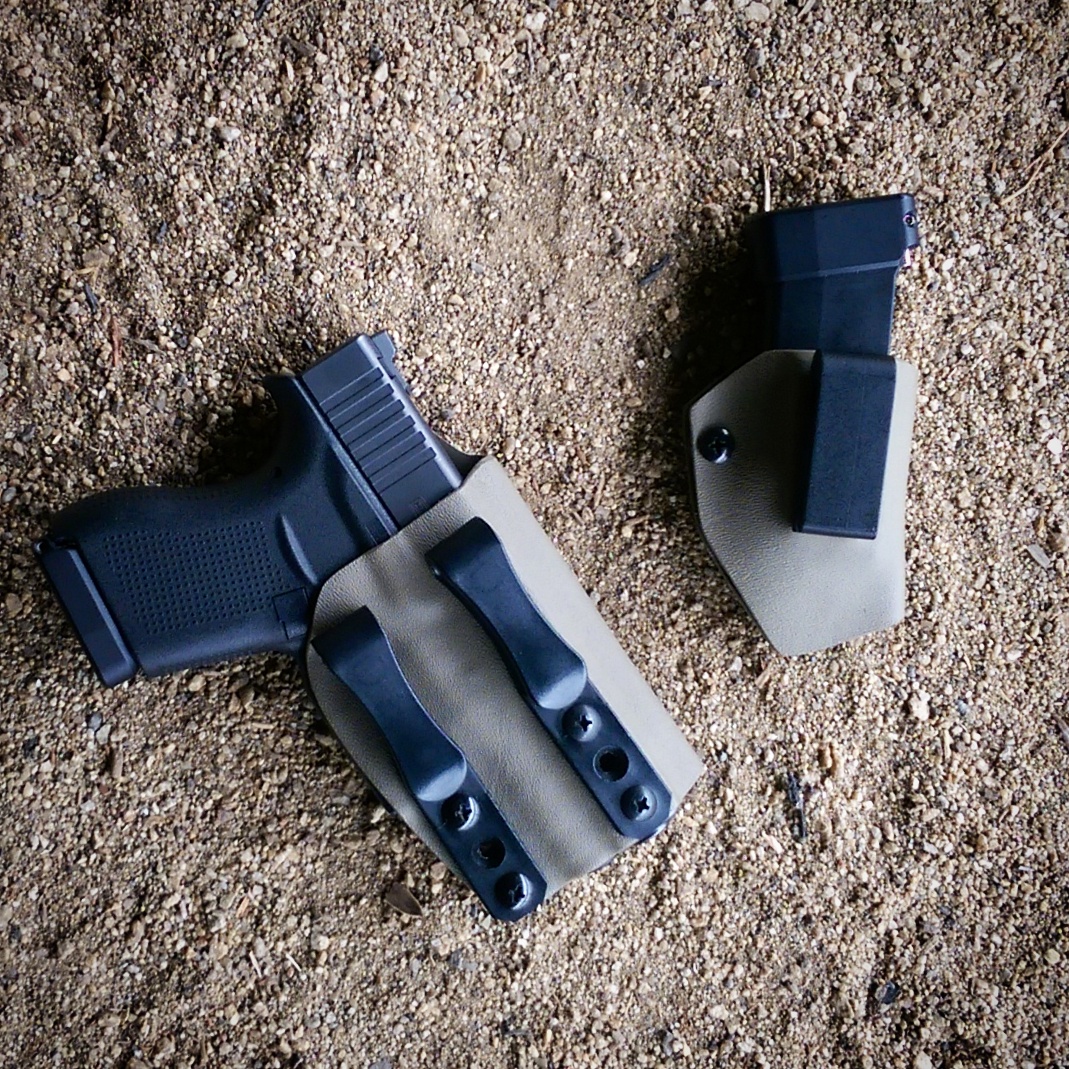
What I got was an Appendix In the Waistband (AIWB) holster and IWB magazine holder for my Glock 43, both in my favorite color, FDE.
I was running an AIWB holster made by Hickory Tree Holsters ever since I got my G43. It was a simple, single clip design and worked fine. It however would move and with my very active lifestyle, I found myself having to adjust and readjust the holster so it wouldn’t print, a bad thing to be doing as it is a dead giveaway to anyone watching.
The TTP AIWB holster was a lot different from my previous in appearance and in feel. The first noticeable feature was that it had two thin clips instead one. They are parallel but a bit off set. I requested a full sweat guard and Mark suggested that I get mole skin attached to add comfort. There are two retention adjustment screws at the bottom of the holster. I’ve never had an IWB magazine holder before, but I’m glad I had one for the class and it’s something that I’ll always have on me. I used to carry my magazines in my support side pocket. In the pocket, they’re not as easy to retrieve as you’d think in practice.
I put the holsters on and immediately I could tell and feel the difference in the AIWB, it was much more secure and stayed put, close to my body. The IWB took a little to get used to but once I found the right placement, it was good to go.
Once we started drawing from our concealed holsters and shooting, I noticed how much of a difference it made to have the stability in your holster. I always knew where my G43’s position was, and since drawing from concealment takes a few more steps than it would from an open holster, anything to assist in speeding up the process could make all the difference. It never moved from the time I drew and shot my G43, so when it came time to re-holster, there wasn’t any guessing as to where it is.
The IWB magazine holder definitely speeds up the reloading process by being in a stable position, also with it being on my support side, I’m used to having my magazines there on my duty setup and all of my pistol setups for that matter. Muscle memory makes drawing my magazine from the IWB holder something I just instinctively do without having to think.
On one of the shoot, reload moving drills, it required two separate reloads and I found it very difficult to find the second magazine that was in my pocket to initiate the final reload.
Mark wasn’t able to attend the class due to work so I didn’t get to talk to him about it during the day. Brett came over during a break and asked how the holster was working for me. I told him that it was working out great and that was when I learned that he was involved in the design of this holster. He always suggests that a good IWB holster should have two clips for all the reasons stated above.
Knowing that Mark collaborated with Brett (a full-time LEO with years of experience and extensive training in this field) tells me that he cares about the quality and function of his products.
The TTP kit is now my Every Day Carry kit. It is light weight, high quality and finished with no sharp edges. Mark is someone who will work with you to make the right solution for your custom kydex holster needs.
You can see his work on his Instagram page @thomas_tactical_precision you can contact him via email: [email protected]
If you want to read my AAR on Iron Works Tactical EDC Class:
I was invited by my best friend Jeff @muzzleflashmedia to attend a shooting class that really sparked my interest, an Every Day Carry class from Iron Works Tactical. I completed the one day class on Saturday and I’m very glad that I did. Here’s my After Action Review below.
I’ll start off with a question: when was the last time you took a class that involved you carrying your EDC pistol as you would in reality (concealed) and run it from that position?
For me, with 8 years in my Law Enforcement career, this was the very first class of it’s kind that I’ve taken. And No, this isn’t your CCW class where you get a certificate for your CCW permit or get legal knowledge on carrying etc. It was geared for the students to learn how to run their guns from their concealment setups safely, validate their equipment and work on their marksmanship-because EVERY round you fire counts!
Iron Works Tactical is owned and operated by Brett, a Full-time LEO and veteran, who is known for building precision AR’s. He runs IWT along with his instructors, who are also Full-time LEO’s, on their few days off that they have. They run training classes to help the shooting community improve their knowledge and skills. The lead instructor for this class was Johnny (@rattlesnake44 on instagram), I’ve known Johnny on Instagram over the years and I finally got to meet him in person at the class. He too, works with the same agency Brett does, and is also a veteran. Johnny really wanted to teach an Every Day Carry class for some time and this was the first class of it’s kind offered by IWT.
We started out at 0800 and there were 9 students total including myself. 6 were civilians, some had CCW permits, some were planning on getting one and 3 were full-time LEO’s myself included. Everyone had varying experience at shooting, none of us were beginners. At the beginning, Brett and Johnny went over their background, experience and went over their concealment setups and the reason for each piece of their kit. Then they had every student do the same so that we all could see all of the different ways people ran their kit. It was interesting to see all of the different setups, everyone is their own “special unique little snowflake” according to Johnny. What works for one may not work for someone else. Everyone did a great job not printing from the get-go.
What I ran for my kit: my pistol is my back-up gun at work and my EDC, the tiny Glock 43. All of my magazines have Taran Tactical Innovations base plates (1 plus one and 3 plus twos) I ran it in an Appendix In the Waist Band (AIWB) custom kydex holster made by @thomas_tactical_precision with input from Brett. I also ran for the first time, an IWB magazine holder, also made by TTP. TTP made this kit for me to run through this class specifically and he made sure that it was all in FDE. I will do a separate review soon on the TTP kydex gear. The belt is a very important part of your kit, my belt was made by @vagabondstitchingco. I have their regular guy 1.5″ belt with a cobra belt buckle in coyote Tan and I’ve been using it everyday for over three years. I conceal everything with a T-shirt.
After the show and tell, Johnny made us do some stretches and short PT to see if any of us printed, had to adjust our kit and if we could comfortably perform these movements, because you don’t simply stand still when you are carrying concealed.
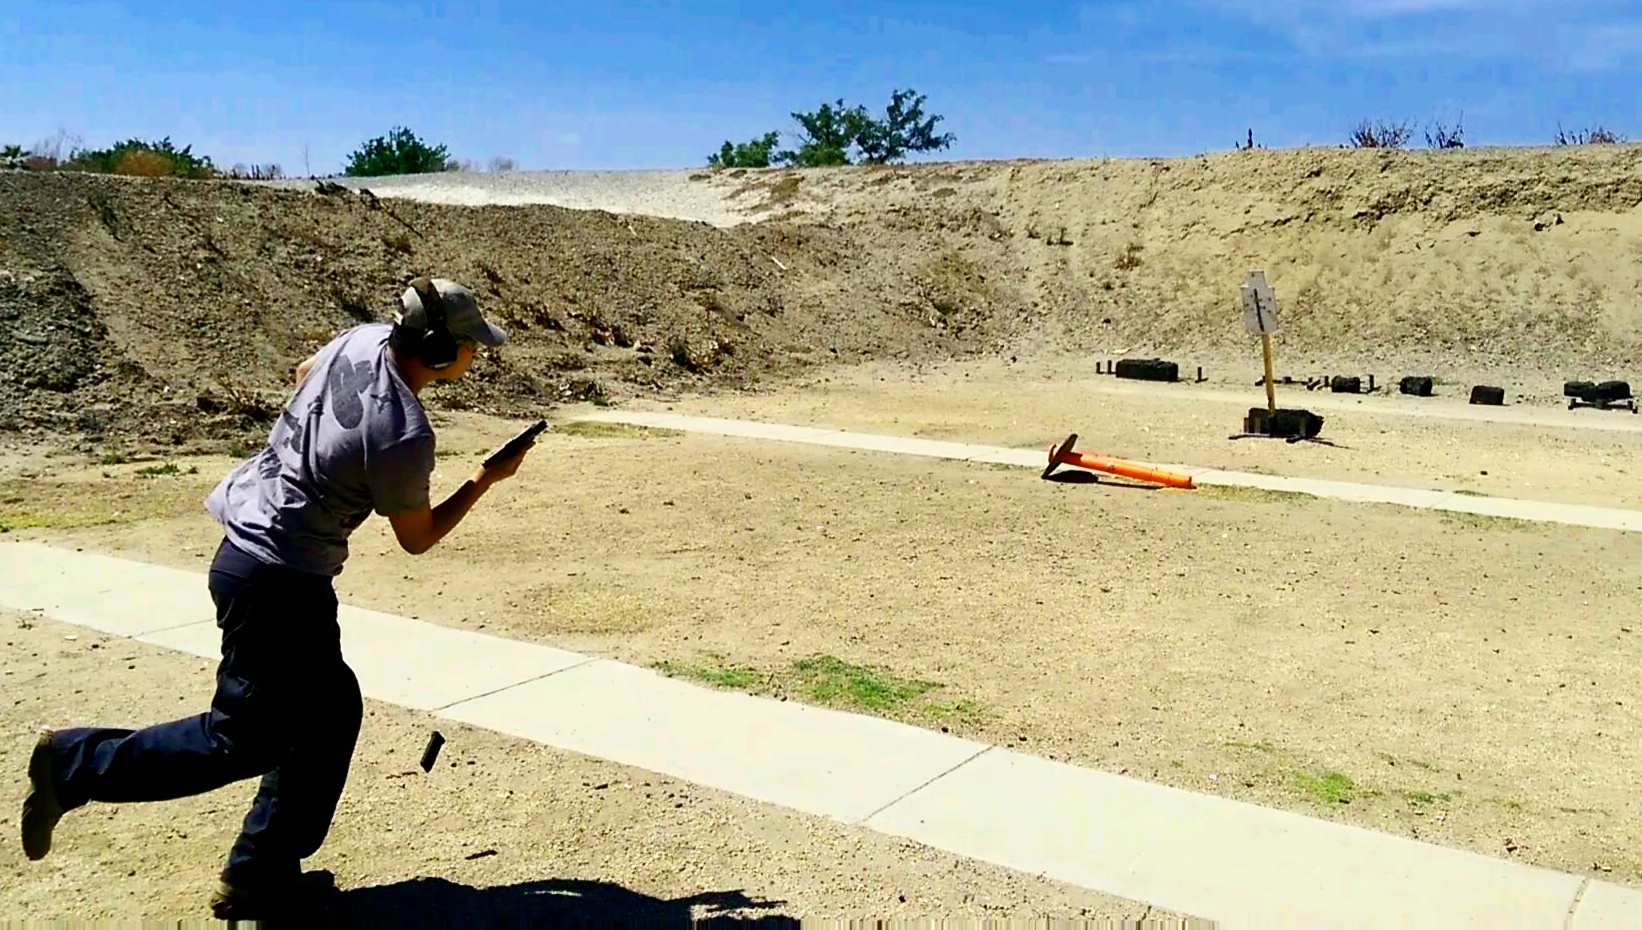
Now that we were all limbered up, we started sending rounds downrange. Johnny made sure we had all the opportunities available to practice our draw from our concealed holsters under clothing. I’ll be very honest, my Glock 43 isn’t my favorite pistol to shoot. It’s pretty common for little guns to be undesirable to shoot, they recoil a lot more than bigger pistols and after a large round count, it starts to get uncomfortable. Before this class, I’ve shot maybe a couple hundred rounds total through it and all slow fire, at 22 feet on a static range. It isn’t my favorite gun to shoot, so why is it my EDC? It is because concealment is my top priority when I carry and with my body type and lifestyle, which is very active, this is my best solution.
We started with the keyhole drill to work on marksmanship. 3 rounds with no time limit; at 3, 5, 7, 15 yards. I was shooting low and left, which took some time for me to fix with instructions from Brett and Johnny. My grip and trigger finger placement needed to adjust, since the G43 is a slim, single stack pistol and all of my shooting revolves around double stacked pistols.
Johnny’s method of teaching was to have us crawl, walk then run.
During the keyhole drill, we all got comfortable with clearing our clothing with both our support and gun hands, and firing from the concealed position (not from behind a bush, but from a concealed carry draw).
Next we shot with an object in our primary gun hand, yes gun hand, if you’re a LEO, you’re trained to never have anything in your gun hand. That makes total sense when you’re open carrying in a duty holster, but in a conceal carry situation, your support hand has a very important job, to move your clothing out of the way in order for your gun hand to grip the weapon. So when you’re carrying concealed, holding things in you gun hand is totally reasonable. So we practiced holding a empty ammo box to mimic a smart phone in our gun hand and having to shoot from there. In order to accomplish this, all you have to do is simply let go of the object and start your draw. After we got acclimated to multitasking with an object in our gun hand. We switched it over to having the object in your support hand. This makes things a bit more difficult, now you have to clear your clothing with your gun hand before you draw. This took more time and coordination. I noticed that my shot placement was the worst during these drills. Adding an extra step most likely subconsciously made me want to speed up to make the shot and miss some fundamentals. One thing I learned to do in this was class was to slow down and make my shots count.
Aim small, miss small. You’ve all heard that before and it proved to be true. Johnny handed out 3×5 flash cards and had us staple them to our targets. We drew and fired a single shot from varying distances out to 25 yards. I started to take my time and took all the instructions that were given to me and applied them and I could see that most of my shots landed on or very close to the 3×5 card.
Gear validation was a very important part of this class and I had absolutely no issue with my TTP kydex. Others weren’t so fortunate, we saw some holsters flying during draws, magazine holders falling apart. This was the moment of truth for us to run our gear very realistically. This includes our weapon that we carried. Not surprisingly, those who ran compact and full-sized pistols shot much more accurately than those of us with pocket pistols. I’ll get into this part later on.
With the basics down, we got into moving and shooting. First we did a random target drill while walking forward. We did this one at a time and while walking towards the target, we would be assigned a random target and would draw and fire two shots at the threat.
Then out came the steel targets. We were run through moving and shooting at multiple targets, using angles and then incorporating reloads. Drills that involve shooting at steel targets are usually my favorite parts of any shooting class. I started to shoot faster than I could do so accurately and had some misses. I was told to slow down after a miss, going against what you want to do, hurry up and make a hit. Speeding things up isn’t going to help you make the next shot, instead it was explained that slowing down will allow you to fix whatever caused you to miss in the first place and make the next shot count, rather than miss faster.
We were reminded that every round we fire counts and has the potential to go for very long distances, and in a real life scenario, there’s to berm to stop your bullet.
The view from 50 yards
We finished up where we started, we worked up on marksmanship, back to the keyhole drill, with a 3×5 flash card and pushed it out to fifty yards. That’s asking a lot from a pocket pistol! Jeff placed a high end video camera behind my target and it wasn’t harmed during the making of the video.
Once the shooting was over, we did an After Action Review with all of the students. Everyone got to talk about what they liked and what needed improvement. All of the students enjoyed the class and took away a lot from it. For improvements, some wanted a higher round count and more scenario training. My suggestion was that this class would be a great beginner EDC class and there should be a follow up class that includes everything that some of the students requested. Johnny took everything we had to say down and since this was the very first EDC that IWT has hosted, he already had similar ideas as he was teaching us throughout the day. This class maybe called EDC1 in the future and there maybe a new class growing from this one.
I made a lot of observations and take aways during the course of the day and so did every student in attendance. All of us were able to validate our kit by actually putting it up to the task for which it was meant for. All of my kit worked out for me, while some kit failed for some of the other students.
All three LEO’s, myself included ran the Glock 43 as our weapon system and at the beginning of the class, we all shot low and left of center. We gradually improved after every drill with advice from Brett and Johnny. We all learned real quickly that we were handicapped by the platform. This was why I was very eager to take this exact class- to run it and improve my skill with this system because it is the best concealable platform for me. My Glock 43 is bone stock with the exception of the Vickers Tactical sights. If you’ve ever shot a Glock 43, you’ll know right away that the trigger is heavier than a standard Glock and the recoil is a bit more snappy. The recoil was a given due to it’s size and weight. Due to my agency’s policy, I can’t do anything with the trigger. I just have to train with what I’ve got. I did get to try one of the other LEO’s Glock 43 that had an OC Custom Glock Trigger that is stock, but polished and it was a huge improvement over my stock trigger. By the end of the class, I was able to get used to my G43 and I actually enjoy shooting it a lot more than I had coming into the class. The other LEO started with his Glock 43 and wasn’t a fan so he switched over to his Smith and Wesson M&P Shield after lunch and did a little better; at the end of the class he mentioned that he was planning on getting a similar M&P9C that Johnny was running as his EDC.
My agency doesn’t train us for Every Day Carry the way this class did. I’m not personally aware of any local Police or Sheriff’s Department in my area that does this type of training. You can practice your draw, reloads and dry fire from home but you probably can’t do live fire practice from your concealment at your local public or even agency’s range. So how are you really going to get some real practice in? It’s by going to classes like this.
I’m always a proponent of firearms training for every law abiding citizen and LEO because there’s no such thing as too much training. Everything you take away from the classes you attend will go into your tool box and whether you end up using that tool or not, you’ll always have the knowledge and training available.
Since my time is very scarce and so is everyone else’s, with all of the available firearms instructors out there. You definitely want to make sure that they have the experience and qualifications to make the most of your time on the range. Both Brett and Johnny are more than qualified for this task and they know how to convey it in a way for you to understand what they mean. This was a class that I needed to take for years and in my opinion, every single person who carries a concealed firearm whether it be a LEO or CCW permit holder should take.
To learn more about Iron Works Tactical, check out their website:
http://www.ironworkstactical.net/
Very special thanks to Jeff for inviting me to attend. Brett and Johnny for teaching me how to run my EDC efficiently and accurately. Mark @thomas_tactical_precision for making all of the custom kydex gear in short notice for me!
If you’ve been following this blog, you’ll know that I’ve been updating my weapon systems and this is probably the last update that I’ve been waiting for. I’ve been moving away from DA/SA pistols and going for Striker-Fired pistols for simplicity of use.
I sold my Sig Sauer P229R a few months ago and finally picked up it’s replacement: the P320C FDE chambered in 9mm.
I got a chance to shoot a friend’s full sized P320 and a P320C (courtesy of Sig Sauer) last year and I’ve wanted one since then.
It comes in a big black pistol case and inside, you have the pistol in a paddle holster (made for the P250, the hammer fired predecessor of the P320); two 15 round magazines, manuals, cable lock and Lucas Oil gun oil.
The P320C is a high quality product that you’d expect from Sig Sauer. My particular model is the FDE (Flat Dark Earth) version, which both the slide and grip module are FDE. You noticed I said grip module and not frame; that’s because the registered firearm is only the chassis that lives inside the grip. Although I don’t plan on doing any caliber conversion with my P320C, I could if I wanted to.
The slide is actually, to me a Burnt Bronze color and the grip module is close to a Magpul FDE. If you know me, I like all of the different shades of FDE. Inside the slide, you can see a lot of internal slide cuts to lessen the weight. It is very easy to take down and will not disassemble with the magazine in place and does not require the trigger to be pulled. The chassis comes out easily after you push through the take down lever. This makes cleaning ridiculously easy. Almost forgot that I also got the model with night sights, which are SigLite and they work well in both day and night time/low light conditions.
So how does it shoot? It shoots very well and accurately out of the box. The trigger has been said to be the best stock, striker fired trigger on the market. I would have to agree with that. It’s very close to my VP9’s trigger, if not better in some ways. The pull weight feels like 6 pounds (I don’t weigh my triggers with a trigger scale) there’s very little take up, then a clean crisp break. The reset is very short and positive, I want to say it’s better than the Short Reset Trigger that was on my P229R.
Between my friend and I, we shot a little over a hundred rounds and we both shot well, he shot much better than me. I’m never afraid to admit that I’m not the best pistol shooter out there. I always am working to improve my skills. Still, almost all of my rounds hit the black rings at 22 feet. My friend’s were mainly in the 9 and 10 rings. There was a little muzzle flip due to the higher bore axis, but nothing I’m not already used to with the P229R so it didn’t bother me. The only minor issue I had while firing was having fun my thumb on the slide release lever, keeping the slide from locking to there rear when empty. I understand that you can order smaller, swept forward slide release levers and also a smaller take-down lever from Sig, but it’s a minor training issue for me and I may or may not order those parts in the future.
I will be running it with a weapon mounted light, the Surefire X300U in Tan (FDE). I contacted Safariland and they are currently making me a level 3 holster for my setup with an X300U and per my request in FDE finish. Once I receive it, it should be available to order in the future. I will keep you updated on that.
Overall the P320C and the P320 series of pistols is a great weapon system that will fill the role of defensive, duty and even competition fields. If you’re already a Sig owner, this is a good one to add.
Some of you follow my Instagram Account @fiftyshadesofFDE so you know a lot about this. I started it last year after I got my SCAR 17s in Flat Dark Earth. It’s my public account where I post pictures and videos of my guns and gear. I also repost content that interest me.
With the EoTech and WarComp
My SCAR 17s has been my favorite rifle that I own and I’ve customized it to serve my needs. For me, it serves as a short to medium range battle rifle. I get a lot of questions about it so I’ll go over all of the after market accessories that make up my Fifty Shades of FDE SCAR 17s.
The easiest way for me to do this is to go from muzzle to buttstock.
I did make a YouTube video going over the accessories.
https://youtu.be/umsflRq9YAY
At the muzzle, I replaced the PWS FSC30 brake with a Surefire MB762 Muzzlebrake. Initially I had a Surefire WarComp 7.62 on but the felt recoil was something close to a 12 gauge slug. The WarComp works as advertised, it eliminates all flash and keeps the muzzle flat. It wasn’t for me and the Muzzlebrake is what I went with. Muzzlebrakes are great with eliminating recoil but they are simply obnoxious to shoot around bystanders, at the range or indoors. For that issue, I have a Surefire Warden, which attaches to the MB762 with ease. The Warden is not a suppressor but it gets real hot real fast. I asked Jr, over at Burn Proof Gear to make me a cover for the Warden.
He quickly sent me a prototype and a few months later, I received the final product. (I haven’t had a chance to range test it yet) but I can say that it is well built and solid fit. I will write a review as soon as I take it out to the range. It is now called the Blast Shield Cover and you can order one here: https://www.burnproofgear.com/product/blast-shield-cover/
Next item is probably the most important in my opinion: the KDG MREX (MLOK) 6.5″ FDE rail extension. You can read my review on that here: http://wp.me/p5LV2Z-3f
Attached to my MREX, I have a Steiner DBal-i2 with Green Laser (this is on loan from a friend and not mine) at the top rail. At the 3 o’clock rail I have a Surefire Mini Scout M300C with a SR07 constant/momentary switch attached to the top rail behind my folded front sight. On the bottom rail, I can attach/detach my Harris Bipod via ARMS throw lever mount. Also at the bottom, I have a Magpul MLOK Vertical Grip.
On the lower receiver, I have a Battery Control Device (BCD) by Parker Mountain Machine. It works exactly like a Magpul BAD lever, except it was designed ground up for the SCAR system. I replaced the stock charging handle to the GG&G angled charging handle. My safety selectors are AXTS/KDG Talon SCAR, given to me from Recoil Magazine for letting them borrow my SCAR for an article for that products’ debut. My pistol grip is a Magpul MOE grip modified by PMM. Standard AR pistol grips need modifications to fit correctly and PMM does that for you!
On top of my receiver, I currently run an Aimpoint PRO with a GG&G cantilever mount that holds a spare battery. I also have a Millett DMS-1 1-4X optic on standby in case I need magnification.
At the very end, I finally got a KDG SAS Stock. KDG takes Magpul ACR stocks and adds a metal adaptor to slide onto the SCAR. It is lighter and stronger than the good ole Ugg Boot but I’m keeping the Ugg Boot because the cheek riser does get higher than the SAS stock for when shooting magnified optics.
And finally the sling: I run a Blueforce Gear Vickers Sling with QD mounts in Multicam Arid.
There you have it! This is my current setup and I don’t plan on changing much in the future but you never know, I’m always open to new ideas and methods. This system is highly modular and it is always adaptable to fit whatever mission I need it to.
I got a rare chance to take a bunch of Surefire Flashlights for a so-called test drive. My friend Steven Schwier over at Surefire’s headquarters found out about my blog and my fascination with everything FDE so he thought I’d like to borrow some of their lights for me to take pictures of and review.
For the first review of the bunch, I’d like to go with the biggest, baddest and brightest: the UDR Dominator. Simply put, it’s by far, the most powerful handheld flashlight I’ve ever experienced. Technically, it’s a spotlight that on Max Blast, outputs a 2400 Lumen beam with a high performance LED.
So how can I tell you in writing, how bright that is? Think about the spotlights on Law Enforcement helicopters on those high-speed pursuits you see on TV. The UDR Dominator probably isn’t as bright or as powerful as the Night Sun spotlights on a helicopter, but it definitely reminds of one, but is portable and handheld.
The UDR Dominator, like everything else made by Surefire, is well thought out, engineered and made to be nearly indestructible. The one I got to review came with a wall charger and a sling. The battery was pretty much drained when I got it, which was good because I could see how long it took to fully charge it. It took a little over an hour to an hour and a half to fully charge. Runtime on high (2400 lumens) is rated at 2.25 hours and on low (14 lumens), it’s 22.75 hours. It has a fuel gauge that displays red , yellow or green based on it’s current level, the gauge light is on when it is in operation. When it’s fully charged, it blinks green. That’s an impressive amount of runtime for a spotlight as bright as this one is.
The ergonomics make it very user friendly to operate. Other than picking it up in the showroom, I have no other experience with the Dominator. It didn’t take me long to figure it out. It has a selector ring with 11 positions staring with an off kill switch, Minimum to Maximum and at the other end, a strobe mode (which is on Max Output). Below the selector rings are three buttons that are labeled left to right: Constant, Momentary, Max Blast. Constant will give you a constant beam at the level where the current position of the selector ring is set. Momentary does the same as the previous, except that it only stays on as long as the button is pushed, hence it’s label. Lastly, you have the Max Blast button, kind of like the rest of the functions, it is self explanatory. Pushing this button gives you all 2400 lumens on a constant On position, no matter where the selector ring is at.
Since the Dominator I am reviewing is the main demo model, I am only able to have it for a short period of time. The only way for me to test it is at night, when took my dog for a walk. I had to be very careful not to piss off my neighbors when running it on Max Blast, so I made sure I wasn’t blasting their homes with it otherwise they might think that there’s a silent police helicopter with a spotlight on their home. The next neighborhood over is in an unincorporated area, which means a lot less street lights and more opportunities for me to hit the Max Blast button. I left the selector ring on a few positions from the Minimum for a short range beam, which was gave me a useful amount of light without destroying my night vision. When I turned the corner into the next neighborhood, the end of the cul-de-sac was about 100 yards or more away and pitch black. There’s no house there to I activated the Max Blast and it lit up the entire wall that is there and I was able to see about a 50 foot area very clearly. I was pretty impressed with the amount of power I had with a handheld device. I made the mistake of using the Max Blast when crossing the street, it was so bright, looking at the white beam pointed at the black asphalt with my peripheral vision was enough to obliterate any night vision I had. If you look at the head of the flashlight, you’ll see that it has fins to help dissipate heat that it generates. If you put your hand in front of the beam on Max Blast, you can feel the heat coming off of it.
For me, I probably don’t need a light this powerful for my everyday usage either in my on and off-duty activities. The UDR Dominator fills a special niche and it does it extremely well. From my life experience of being a Peace Officer and a gun enthusiast, I can see the Dominator used for Search and Rescue teams, Sentry positions like static security etc, anyone who goes out doors often or simply everyone who needs a durable, reliable, powerful spotlight. I say that is a niche item because although it is handheld, it isn’t small and wouldn’t fit in your pocket. It’s a super heavy duty illumination device that won’t let you down if you need it to identify objects, people, threats in the dark of the night. The MSRP according to Surefire’s website is at $1,370.00
I understand a lot of you will say that’s expensive. I agree with you that is pricey but the going trend on my blog is that you get what you pay for. With Surefire, everything is designed, manufactured in the US of A and it, along with all of Surefire’s products, comes with their No-Hassle Guarantee- For Life!
For more information and where to get one:
http://www.surefire.com/illumination/flashlights/udr-dominator.html
This would be my first knife review on this blog and I’m starting it off with a very nice one!
If you are familiar with Surefire products, you’ll remember that they used to have an Edge Weapons Division that Steve Ryan headed. That division is no longer in existence at Surefire but Steve is still making blades on his own and he has been doing so for many years.
During a visit at Surefire’s office, I was asked if I could write up a blog and take pictures of Ryan’s Push Dagger. Of course I agreed to do it! Full disclosure: the Dagger is on loan to me for the week, I am not getting paid to do any of this.
I will be honest, I’m not a knife expert or fighter. I’m more of an Indiana Jones type of guy when it comes to knife fights. I do however, have years of experience carrying various edged weapons and I know the difference between low and high quality knives.
The Steve Ryan Push Dagger I received was in brown (another shade of FDE to me) it came in a black, injection molded TekLok sheath. It feels solid as soon as you pick it up. The retention from the sheath is stiff and drawing from it is easy once you get a good grip on the handle.
The blade is made of stainless steel and is razor sharp; I didn’t test that feature out because only bad things could occur. It is attached to the handle/hilt via three small screws. The handle has a frag pattern that resembles a pineapple grenade. Every piece of this dagger, including the sheath looks and feels like quality with a high degree of attention to detail. It fits in my hand well and us easily controllable once drawn. If you’re looking for a high-end push dagger, look no further!
They retail for $149 and you can find them here:
http://www.monkeyedge.com/Steve-Ryan-Punch-Dagger-Monkey-Edge-FRAG-Pattern-p/srk0125.htm
Trijicon is best known for their Bright and Tough Night Sights on pistols. A few years ago they came out with a new line of night sights: the HD Night Sights. They solve the problem that night sights have: daytime shooting. Night sights are sometimes hard to pick up during daylight conditions.
The HD Night Sights differ from standard night sights by having a a big dot for the front sight. The tritium vial is surrounded by Yellow or Orange fiber optic ring. The rear sights have a raised shelf to assist with racking the slide for one handed operations. The rear face of the rear sights are serrated to deflect light and have two small vials of tritium on either side of the U notch center. I find the U notched rear sights very effective in helping with the sight picture. The whole system helps the user focus on getting a perfect sight picture with the main focus on the bright front sight without the rear sight being too much of a distraction. In bright lighting conditions, the fiber optic ring just jumps out at you, making your target acquisition that much faster.
My Heckler and Koch VP9 came with the stock factory sights that were luminescent night sights that require a lighting source (a flashlight) to charge the Luminova paint on the metal sights. They were extremely bright when you shined your flashlight on them for a quick burst. They were also extremely bright during daylight conditions. They would work for most people but not for me. My VP9 lives in my duty holster for the majority of its time. With the front sight always in the dark, the Luminova never gets a charge so if I had to draw my weapon to deal with a threat in a low light situation, I wouldn’t be able to see the front sight at all. The rear sights would be glowing but that didn’t help me at all. Luckily I always run a Weapon Mounted Light on my duty weapon and if you do as well, you’d know that any weapon light would make your sights shadows. Why do you need night sights if you have a WML? The answer is, you don’t run your light the entire time because you’re a bright target if you do that. When your light is off, you will still need to see your sights to make that shot.
Front Sight focus
Rear Sight focus
I got my HD Night Sights off of Instagram, new from someone who went away from the VP9 platform for $100. They retail for much more than that. The one’s I got were with the Yellow front sight. I wanted the Orange but a deal’s a deal and I’m still happy with them.
Installation was something I learned that I couldn’t do myself. I had my MGW USP sight pusher, which didn’t work because the VP9 has a pair of plastic slide assist tabs at the rear of the slide. This prevented the slide from entering the sight pusher. Luckily for me, my department armorers have a MGW universal sight pusher system and all I had to do was buy a VP9 shoe for $15 from Brownell’s and they took care of the installation for me.
The HD Night Sights are easily the best night sights I’ve ever shot with on a pistol in any light. I’ve seen videos and read other reviews and haven’t seen or heard anyone complain about them.
The sights are taller than standard sights and I was worried that they wouldn’t fit in my Safariland Duty holster and luckily for me, they barely fit. I was very relieved that it reholstered after the install because these sights are too good not to have on my VP9.
There are more accessories available for the FN SCAR platform out today than ever. Thanks to many different companies including Kinetic Development Group. KDG makes the MREX rail for SCARs and now ARs, the ACR stock assembly for SCARs, and many other cool gadgets that are all well thought out, designed and manufactured. All made in the US of A. AXTS is well known for their Raptor AR charging handles and Talon Safety Selectors for the AR platform. Now the two companies collaborated to come up with a Talon selector for the SCAR platforms.
I had a minor role and got involved with the KDG/AXTS Talon SCAR selector by being in the right place at the right time. Owning a SCAR helped out. David Reeder from Recoil Magazine contacted me through a mutual friend and asked if Recoil could borrow my SCAR 17s for a quick photo shoot. Of course I said yes!
After sitting in traffic for a ridiculous amount time for the few miles I needed to travel (something that David got to experience in his time in SoCal) I met with the guys at Recoil headquarters. They’re all down to earth and extremely friendly, they even gave me some frozen Caribou that Iain Harrison had shot months before for an article on hunting. They took my SCAR and returned it a few days later with the SCAR Talon selector installed and a bunch of Recoil magazines and shooting targets. The set I got had the regular sized selector on the left side and a short sized selector on the right. Both had the black finish.
Immediately I started to function test it and found it extremely easy to manipulate with my thumb and best of all, my trigger finger. In my experience with the different selectors I’ve had on my SCAR, these are hands down the best. I didn’t really care for the stock selectors so I replaced those with Parker Mountain Machine metal selectors which were an improvement and well made. I have small and short fingers so I still found it a bit difficult to use my trigger finger to manipulate the selector on that side. Unlike the stock and the PMM selectors, which just replace the switches, the Talon Selector replaces the entire drum and holds the switches via detent springs. This makes it easy to switch out without any allen wrenches or tools. Another feature is that they can go 90° like a standard AR for those who prefer it that way. I kept mine at 45°.
There’s my SCAR in the latest issue of Recoil Magazine!
A few weeks later I got in some range time and shot my SCAR with the new Talons, manipulating them with every possible way and it was easily done. Here’s a video of my range testing: https://youtu.be/mmQzEckeLpw
In my opinion, the KDG/AXTS SCAR Talon selectors are the best aftermarket selectors available for this platform and will work on both 16’s and 17’s. I now want a set for my M6A2! They come in FDE or Black and should be available at www.kineticdg.com for $79-$89. I don’t know when they’ll be in stock but I believe it’ll be soon.
This post is to help all of the new shooters decide which handgun would be perfect for them to purchase for self-defense purposes. Let’s start with the Four Rules of Gun safety:
1.All guns are always loaded. (Treat them like they are)
2. Never point the gun at anything you are not willing to destroy.
3. Keep your finger off the trigger until your sights are on target (and you have made the decision to shoot).
4. Be sure of your target and what is beyond it.
I have been asked a lot from friends and family members recently for this particular type of advice. This comes after the Paris and San Bernardino Terrorist Attacks. Those that were on the fence about gun ownership have decided that now is the time to obtain the right tool for the job: a firearm.
First I would like to recommend the caliber: 9mm. There’s a lot of reasons behind this:
It is easy to control recoil, making easier and fun to shoot and therefore you’ll shoot it more often. The ammunition is inexpensive compared to the bigger calibers. With the minimal recoil, there is less wear and tear on the weapon, making it more durable. For an actual self-defense role, it should be loaded with defensive ammunition and it will do it’s job well at stopping the threat.
Next would be the handgun size. It’s much easier to control a full size or compact handgun than a subcompact. The subcompact handguns recoil much more because of it’s shorter barrel and light weight. It’s just physics. The only reason to have a subcompact is for the purpose of carrying concealed. I still would suggest that you start with at least a compact sized handgun.
Lastly I highly recommend that you start with a striker fired pistol. The trigger pull is the same every time and you won’t have to learn different triggers. These pistols have less parts and are as simple as they can be: draw it, aim, and press the trigger. Under stress you don’t want to worry about whether your safety selector is on or off. This doesn’t make the pistols less safe. They have multiple safeties in place that will not fire unless the trigger is pressed. If you really want a manual safety there is a few models available for you.
Onto the make and models:
Glock is the most popular striker fired pistol and for good reason. They have great value and have the least amounts of parts and have a reputation for reliability and accuracy. As long as you practice and follow the gun safety rules, these guns are very safe. I mention the rules because you have to pull the trigger in order to disassemble the pistol.
The two Glocks I recommend are:
Glock 17 (Full Size)
Glock 19 (Compact)
The following pistols don’t require you to pull the trigger to field strip.
Smith & Wesson Military and Police series pistols are a newer version of reliable striker fired pistols that are a little more ergonomic than Glocks. They come with different sized back straps that you can interchange to fit your hand size. Some models have an optional frame safety.
The S&W models I recommend:
M&P9 (Full Size)
M&P9C (Compact)
Springfield Armory XD’s are also nice striker fired pistols.
XD9 (Full Size)
XD9 Compact
The following are for those who are Full-time Peace Officers or non-California residents.
Heckler and Koch VP9 is currently my favorite pistol and happens to be my duty weapon. I wrote a review on it a few months ago and you can read it here:
Sig Sauer P320 (Full Size) & P320C (Compact) these pistols are fairly new and have a lot of features and a very nice trigger. I’m in the process of selling my P229 to buy a P320C.
As you can see, I am simplifying my weapons systems to striker fired pistols. Although I’m used to the DA/SA trigger pulls, it’s just so much easier to have the same trigger pull and never have to worry about decocking the hammer.
I hope this helps you make your decision on your first handgun/ pistol purchase. Do NOT think for a second that just because you have a firearm that you are safe from someone threatening your life! Firearms often give people a false sense of security. You must train and practice often to be able to operate it, let alone in a high stress environment (which will definitely be the case if your gun is out and drawn). I cannot stress enough that you seek professional training and practice dry firing and put in some range time as often as you can. Please be safe and if you have any questions at all, please leave a comment!
Trijicon has an excellent reputation in optics for all sorts of weapons systems. They’re known to be rugged and reliable.
The RX30 is a 1×42 6.5 MOA amber dot optic. It has been and still is the optic on my LWRC M6A2 5.56 rifle.
I remember why I choose to get the RX30 over an aimpoint when I was at the store many years ago. The first factor was cost. Back then the Aimpoint PRO didn’t exist. I didn’t have the budget for an Aimpoint plus a mount. I then picked up the RX30. It had a lot of features that I liked off the bat: it was more affordable and it came with a mount; it had a good field of view with a dot that was easy to find. The best feature I thought at the time was that it didn’t require any batteries, it uses tritium for low/no light environments and fiber optics to gather ambient lighting conditions to automatically self adjust it’s brightness. So I was sold and I still run with it on my rifle to this day.
All of the features sound great on paper, but in actual use over the years, I found some drawbacks with it as a system. None of it makes it a bad optic, it works well and holds zero. In almost everything you use, you will have to train with it and see how it works with you or how you can work around it. The RX30 is no different.
Let’s go over it’s drawbacks. First would be it’s 6.5 MOA dot. It’s perfect for quick acquisition and for close up shooting. I found that the dot size would obscure targets that were further away beyond a hundred yards. I’m confident that I can still send accurate shots further than 100-200 yards but to be honest, a smaller dot would work better with more precision.
The biggest drawback I found was the dot washing out. In certain conditions, the amber dot is not bright enough and therefore is washed out. There are two main conditions: the first is having the target area being brighter than where the shooter is. This happens if you’re under some shade or inside a building or structure while your target is under full day light. The second is in low/no light conditions when the dot is only illuminated by it’s tritium power source. When you use your weapon light, the dot will disappear; especially if you’re in your home.
It sounds like a big deal, but it isn’t. My work around is having my BUIS up at all times just in case the dot washes out.
Overall I’m satisfied with my RX30. It has been proven to be rugged and has held it’s zero ever since I zeroed it in years ago. I’m pretty rough with my weapons, I don’t abuse them but I don’t baby them or would care if they got dinged up. Remember that they are tools and not artifacts in a museum. This optic is a good combat optic and serves my needs well. I can quickly engage targets out to a few hundred yards. I don’t expect to engage targets further out with this weapon system, but I still could still fire rounds further if I had to with less accuracy.
With the different advancements in technology over the years, there are many different options available today that I would probably get instead of the RX30. The two that come to mind are the Aimpoint PRO, which comes with a mount and battery life of 3 years on a certain setting; and the Trijicon MRO that also comes with a mount and has an advertised battery life of 5 years. Both also have a 2 MOA dot. I have picked both of them up but have not shot with either so that’s the extent of my knowledge with those optics.


